雖然 Butterfly 主題本身就很美了只是我因為可能是個人因素吧還是有些不滿意的地方
- 譬如寬度和側欄
所以試著跟著網路上的文章和自己的摸索透過使用 CSS 美化(?)了一下我的主題
現在你看到的樣子就是修改過的樣子
這篇文章希望可以幫到也想做跟我差不多改動的小夥伴們
我會把我做的更改紀錄在這裡像用的可以一鍵複製我的代碼搭~
事前配置
首先要魔改主題前要先建立一個新的 css 頁面
我的話會叫他 custom.css
(透過這個方式如果搞砸了什麼刪掉這個 css 檔案就可以當作什麼事都沒發生過拉w)
創建在以下這個位置:
- themes/butterfly/source/css
參考圖:
5 是你原本(應該)沒有的要自己創建搭
如果你已經有一個叫做 custom.css 的檔案了的話就不要動它好了再建立一個叫做其他名字的 css 檔案吧
然後建立好後打開你的 _config.butterfly.yml
找到
https://wningningw.blogspot.com/ 官網連結1
2
3
4
| inject:
head:
bottom:
|
在 head 下面加入你剛剛建立的 css 檔案參考圖:
你也可以選擇直接複製以下的代碼 (為了怕出錯) :
請直接複製以下的代碼官網連結1
2
3
4
| inject:
head:
- <link rel="stylesheet" href="/css/custom.css">
bottom:
|
- 如果空格或是 tab 有錯的話就會報錯!!
- 務必要注意好間隔!!!
這樣就可以拉 接下來就是編輯這個 CSS 檔案拉
修改Footer官網連結1
2
3
4
5
6
7
| #footer {
background-image: linear-gradient(-225deg, #E2D3FF 0%, #B3F2FF 28%, #86B9FF 100%);
}
#footer:before {
background-color: rgb(0, 0, 0);
}
|
以上的代碼可以將你的 footer 變得像是我的網站現在的樣子
參考圖圖:
編輯名字顏色
修改Footer官網連結1
2
3
| .author-info__name {
color: #8a99e5;
}
|
- 以上的代碼可以修改你的名字的顏色
#8a99e5 為紫色, 你可以透過改變裡面顏色的代碼來改變顏色- 推薦一個專門選顏色的網站: 點我進入
參考圖:
改變側欄,文章的寬度
修改Footer官網連結1
2
3
4
5
6
7
8
9
10
11
12
13
14
15
16
| .layout{
max-width:1400px;
}
.aside-content{
max-width:400px;
min-width:350px;
}
.recent-posts{
width:auto!important;
}
@media screen and (max-width: 1000px){
.aside-content{
max-width:none!important;
}
}
|
- 以上的代碼可以將你的網站畫面變寬,更有效的利用螢幕的空間
- 也可以把文字大小變大一些,看起來也不會太怪
(我會想做這個改動也是因為把文字大小變大之後發現畫面看起來很不和諧所以才決定把放內容的這些地方拓寬的)
參考圖:
原本的畫面寬度:
H1-H6 ICON圖標顏色
以下的代碼是用來給每個不同大小的文字/標題的圖標自己的顏色
H2
H3
H4
H5
H6
添加CSS官網連結1
2
3
4
5
6
7
8
9
10
11
12
13
14
15
16
17
18
19
20
21
22
23
24
25
26
27
28
29
30
31
32
33
34
35
36
| #content-inner.layout h1::before {
color: #E0C879 ;
margin-left: -1.55rem;
font-size: 1.3rem;
margin-top: -0.23rem;
}
#content-inner.layout h2::before {
color: #E87461 ;
margin-left: -1.35rem;
font-size: 1.1rem;
margin-top: -0.12rem;
}
#content-inner.layout h3::before {
color: #5171A5 ;
margin-left: -1.22rem;
font-size: 0.95rem;
margin-top: -0.09rem;
}
#content-inner.layout h4::before {
color: #A1CF6B ;
margin-left: -1.05rem;
font-size: 0.8rem;
margin-top: -0.09rem;
}
#content-inner.layout h5::before {
color: #D1BCE3 ;
margin-left: -0.9rem;
font-size: 0.7rem;
margin-top: 0.0rem;
}
#content-inner.layout h6::before {
color: #5ec1e0 ;
margin-left: -0.9rem;
font-size: 0.66rem;
margin-top: 0.0rem;
}
|
- 想改變星星的顏色可以自行更改顏色代碼搭
- 配色困難的人可以點我
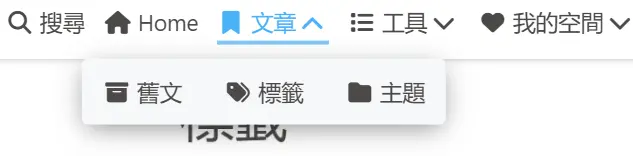
二層下拉選單樣式修改
範例(修改後的外觀):
1
2
3
4
5
6
7
8
9
10
11
12
| .menus_item_child li:not(#sidebar-menus li){
float: left;
border-radius: 6px!important;
-webkit-border-radius: 6px!important;
-moz-border-radius: 6px!important;
-ms-border-radius: 6px!important;
-o-border-radius: 6px!important;
}
.menus_item_child:not(#sidebar-menus ul){
left:50%;
translate:-50%;
}
|
自訂 CSS | 修改 Butterfly 主題外觀 【Butterfly 美化教學#2】
)